Welcome to MAVROS_Tutorial
Author: Masoud Iranmehr
Github Page: https://github.com/masoudir/mavros_tutorial
C++ Examples on Github: https://github.com/masoudir/mavros_cpp_examples
Python Examples on Github: https://github.com/masoudir/mavros_python_examples
Web Page: https://masoudir.github.io/mavros_tutorial/
Introduction
This project illustrates some examples about simulating robots via Ardupilot-SITL using python and C++ languages and MAVROS (MAV-link protocol for Robotic Operating System).
Install Requirements
Install some requirements
Just follow this command:
sudo apt-get install python-dev python-pip python3-dev python3-pip python3-rospkg- Installs python3 and pip3.
Install Ardupilot-SITL
reference : https://ardupilot.org/dev/docs/building-setup-linux.html
Install MAVProxy (Auxiliary)
I prefer to use external proxy if I needed for MAVlink protocol. MAVProxy can forward any MAVLink messages from input to other TCP/UDP/Serial ports. It would be helpful if you are using one vehicle for two or more GCS or controller nodes. To install just use this command:
pip install MAVProxy- Install MAVProxy with pip in python2
Install ROS
ROS is semi-Operating System for robots. ROS is generally available for many programming languages such as C++, Python, Javascript and etc. It's free and easy to use. Until now there are three supported versions of ROS (kinetic, melodic and neotic) and I prefer to use melodic in this document. To install ROS-melodic, there are two ways of installing from ready-built binary files or installing from source. I prefer to install the full-version of ros-melodic. If you are not using ubuntu, it's likely to face some problems in installing ROS from binary files mentioned in ROS tutorials from source, because its procedure is common for any kinds of linux platforms.
For install ROS-melodic from source you can refer to this link.
For install ROS-melodic from binary files you can refer to this link.
Install MAVROS
If you want to have installed ROS from binary files, this is recommended to install MAVROS from binary files too.
Install MAVROS from binary files
For this, you can refer to this link.
For case of ease, the commands to be executed for installing MAVROS from binary files are as below:
sudo apt-get install ros-melodic-mavros ros-melodic-mavros-extras
wget https://raw.githubusercontent.com/mavlink/mavros/master/mavros/scripts/install_geographiclib_datasets.sh
chmod a+x install_geographiclib_datasets.sh
./install_geographiclib_datasets.sh
Install MAVROS from source
If you are not using ubuntu, this is strongly recommended to install MAVROS from source due to the similarity between various Linux distributions. You can refer to this link for full documentation. But here is the abstract commands:
-
source <ROS_INSTALL_PATH>/devel/setup.bash- Defines the installed folder of ROS (You can insert this command at the bottom of ~/.bashrc file to automatically run this command while opening a new shell. For this, you can use this command:sudo nano ~/.bashrc) -
roscore- Brings up ros core for accessing its functions and built packages -
sudo apt-get install python-catkin-tools python-rosinstall-generator -y- Installs python packages related to ros -
cd ~/my_catkin_ws/src- Jump to catkin src folder -
git clone https://github.com/ros-geographic-info/unique_identifier.git- clone unique_identifier package -
git clone https://github.com/ros-geographic-info/geographic_info.git- clone geographic_info package -
cd ~/my_catkin_ws- Jump to catkin folder -
catkin init- Initialize catkin workspace -
wstool init src- Initialize ros package installer -
rosinstall_generator --rosdistro melodic mavlink | tee /tmp/mavros.rosinstall- Install MAVLink (we use the melodic reference for all ROS distros as it's not distro-specific and up to date) -
rosinstall_generator --upstream mavros | tee -a /tmp/mavros.rosinstall- Install MAVROS: get source (upstream - released) -
wstool merge -t src /tmp/mavros.rosinstall- Create workspace & deps -
wstool update -t src -j4- Builds the ros workspace -
rosdep install --from-paths src --ignore-src -y- Install packages for ros -
./src/mavros/mavros/scripts/install_geographiclib_datasets.sh- Install GeographicLib datasets -
catkin build- Build source -
source devel/setup.bash- Uses setup.bash or setup.zsh from workspace so that rosrun can find nodes from this workspace
For installing MAVROS from binary packages please refer to https://ardupilot.org/dev/docs/ros-install.html#installing-mavros.
Ignite Rover robot
Bringing up Ardupilot-SITL for Rover
-
cd <Your_Ardupilot_Instalation_Folder>/ardupilot/Tools/autotest/- Jump to ardupilot folder -
python sim_vehicle.py -v Rover- Start Rover vehicle
Becareful to do not use python3 to run or build MAVProxy due to some mismatches found in this package with MAVProxy modules such as "map" and "console".
Note that if you want to show other SITL modules such as map or console, you can use these commands:
python sim_vehicle.py -v Rover --map --console
Or alternatively you can mention them inside SITL terminal:
module load map

module load console
Note: Please be patient when ardupilot is compiling robots at first time. This takes 2-3 minutes to complete.
You can see that ardupilot-sitl created some outputs such as "127.0.0.1:14550" "127.0.0.1:14551". These are auxiliary UDP ports for communicating this vehicle to another MAVProxy console. We use these ports in examples.
Connect Rover to MAVROS
At first you have to source ROS and MAVROS. If you have installed them from binary files, follow these commands:
source /opt/ros/melodic/setup.bash- Defines the installed folder of ROS and MAVROS
Or if you have installed them from source, follow these commands:
-
source <ROS_INSTALL_PATH>/devel/setup.bash- Defines the installed folder of ROS (You can insert this command at the bottom of ~/.bashrc file to automatically run this command while opening a new shell. For this, you can use this command:sudo nano ~/.bashrc) -
source <MAVROS_INSTALL_PATH>/devel/setup.bash- Defines the installed folder of MAVROS (You can insert this command at the bottom of ~/.bashrc file to automatically run this command while opening a new shell. For this, you can use this command:sudo nano ~/.bashrc)
Then it is the time for bringing up the core of ros:
roscore- Brings up ros core for accessing its functions and built packages
Afterwards, you have to tell the MAVROS how to find the vehicle you are using it:
roslaunch mavros apm.launch fcu_url:=udp://:14550@- Connects vehicle from UDP:14550 port to MAVROS
Or if you want to connect to your robot via TCP port remotely, you can use this command
roslaunch mavros apm.launch fcu_url:=tcp://<REMOTE_HOST>:<TCP_PORT>@- Connects vehicle from REMOTE_HOST:TCP_PORT port to MAVROS
View ROS topics
-
source <ROS_INSTALL_PATH>/devel/setup.bash- Defines the installed folder of ROS (You can insert this command at the bottom of ~/.bashrc file to automatically run this command while opening a new shell. For this, you can use this command:sudo nano ~/.bashrc) -
rqt- Executes ROS plugin monitoring window
Then in rqt window shown, you have to select from "Plugins" > "Topics" > "Topic Monitor" to stat topic monitoring. This will show you the bottom figure:
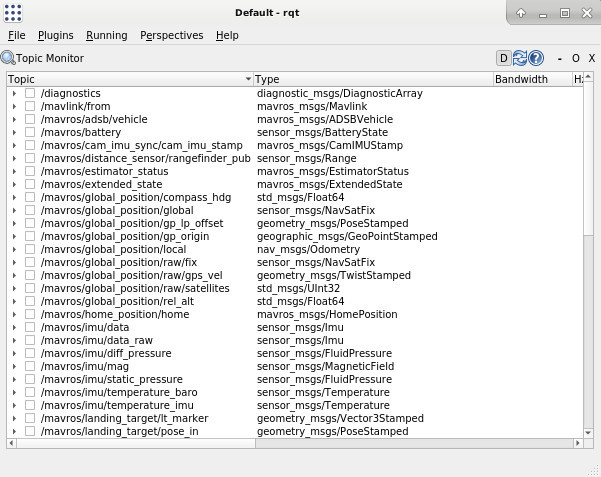
You can tick any of the topic shown and monitor its contents. But in my own experience, I think that it's better to use commands in terminal or write them down in your scripts (bash, C++, python and ...)